Cloning Flappy Bird for the Nintendo 64 with libdragon (Part 3)
Editor’s Note: LibDragon has changed since this was originally written. The command-line and code snippets in this article may not work correctly anymore.
In the previous post we set up our open-source N64 toolchain with libdragon and built the spritemap example ROM. In this third post we will continue pulling together the pieces necessary to pull off a convincing Flappy Bird clone despite the limitations of libdragon and the Nintendo 64 graphics hardware.
Check out the other posts in this series:
Flappy Bird for Nintendo 64 Project Site
- Introduction to Flappy Bird and N64 homebrew
- Starting an N64 homebrew project with
libdragon - Adapting Flappy Bird resources to
libdragonand the N64 hardware
Flappy Bird for Nintendo 64 is a noncommercial work used for pedagogical and research purposes that does not compete with or deprive income from the original copyrighted work. Under normal circumstances ripping images and audio from someone else’s work is generally considered an inadvisable violation of copyright law, but in this case I am hiding behind claiming fair use.
Borrowing some materials
The Flappy Bird iOS app generously packs all of its image resources together into a single 1024x1024 PNG file. The iOS game code slices this big atlas up at run-time to display individual graphics, but for the Nintendo 64 port we’re going to have to do all of our image processing up-front. Our end-goal is to fit these graphics onto a 320x240 framebuffer, so the first thing to do is resize the whole atlas by 50% vertically and horizontally.
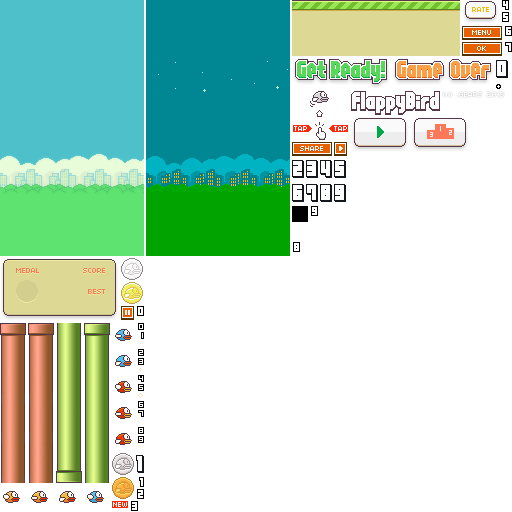
Next we can start breaking this atlas out into separate spritesheets. The N64’s RDP (Reality Display Processor) has a maximum texture size of 4 kilobytes, which is a whopping 32x32 pixels at 32-bit color depth (1024 pixels at 4 bytes per pixel). Dropping down to 16-bit color offers some additional headroom (2048 pixels at 2 bytes per pixel) at the expense of color depth (5-bits per channel vs 8-bits per channel) and alpha channel depth (1-bit vs 8-bits). Unfortunately, some graphics in the atlas are still going to be too big, such as the pipes and the backgrounds.
User interface elements
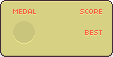
For the titles and the scoreboard we will just use the images as-is and render them in software to get around this TMEM limitation:


Since we’re going to be mapping the bird “flap” functionality to the “A” button on the controller, we’re going to need a modified “tap the screen” instruction graphic:

Flipping the bird
While we’re extracting the bird sprite, we need to talk about a concession that I’ve decided to make regarding authenticity: libdragon does not support sprite rotation. It is possible to use textured triangle drawing commands on the RDP to perform this function, but in practice the low resolution and composite video artifacts did not look good, so I decided that the bird would only rotate while falling to its death:

Sprite rotation with pixel art works on iOS because each “apparent pixel” of the source graphic is actually rendering as at least an order of magnitude higher resolution. On the N64 we have no concept of fractional pixels, so detail will be lost:

An alternative approach would be to draw out new bird sprites for different degrees of rotation by hand, but after a few ugly-looking attempts I gave up and decided it was better that the bird look recognizable than emulate the original aesthetic exactly.
Pipe fitting
If we want to draw the backgrounds and pipes with the RDP (which of course we do, for maximum speed), we are going to have to do some aggressive slicing to fit the backgrounds into TMEM. There are some obvious redundant pixels that can be drawn in with clever use of tiling (which we get for free with hardware-accelerated sprites). For instance we only really need a small sliver of the “tube” part of the pipe which can be repeated vertically and then “capped” on the top or bottom with the fitting:


Background elements
The atlas-provided “ground” image uses a flat tan color for the “dirt”, which we can just draw at run-time using filled rectangle drawing commands on the RDP, so we really only need a small slice of the “grass” portion that is suitable for tiling:

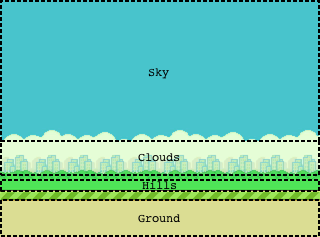
We can use a similar technique on the background, which has large horizontal bands of solid colors that can be stripped away for the sky, clouds, and hills, leaving us with three essential strips of detail that need to be tiled:
- The hill tops:


- The city:


- The cloud tops:


Minor tweaks to the images were made to ensure that the strips tile correctly. While not accurate to the original work, a nice bonus to this approach is that we are no longer restricted to a static background, so we can move these tiled strips horizontally at different rates to create a parallaxing effect (more on that later):
Creating a compilation pipeline
Now that we have extracted the image atlas into separate spritesheets (as PNG files), we need a way to propagate the image data into the final ROM file. This is a three-step process:
- Convert the
.pngfiles into.spritefiles usingmksprite - Pack the
.spritefiles into a.dfsarchive usingmkdfs - Combine the compiled game code with the
.dfsarchive into a.z64ROM usingn64tool
The existing Makefile from the spritemap example covers 2 & 3, so all we need to do is iterate through all of the PNGs and call mksprite with the right arguments. Calling mksprite with no arguments yields its usage:
Usage: mksprite <bit depth> [<horizontal slices> <vertical slices>] <input png> <output file>
        <bit depth> should be 16 or 32.
        <horizontal slices> should be a number two or greater signifying how many images are in this spritemap horizontally.
        <vertical slices> should be a number two or greater signifying how many images are in this spritemap vertically.
        <input png> should be any valid PNG file.
        <output file> will be written in binary for inclusion using DragonFS.
Well, we know the input and output files and we’ve established that the bit-depth is going to be 16, so all we need is a mapping of input files to number of horizonal and vertical slices in each spritesheet. I designated a file called manifest.txt alongside the PNG files to store this mapping in a simple whitespace-delimited text file:
bg-city-day     1   1
bg-city-night   1   1
bg-cloud-day    1   1
bg-cloud-night  1   1
bg-hill-day     1   1
bg-hill-night   1   1
bird            4   3
font-large      10  1
font-medium     10  1
font-small      10  1
ground          1   1
headings        1   2
how-to          1   1
logo            1   1
medal           1   4
new             1   1
pipe-cap        2   2
pipe-tube       2   1
scoreboard      1   1
sparkle         3   1
To simplify the Makefile, I created a utility script called convert_gfx.sh which accepts one or more .png files as arguments, looks up their entries in the manifest, and creates .sprite files. This is hooked up to make with a pattern rule:
$(SPRITE_DIR)/%.sprite: $(PNG_DIR)/%.png $(PNG_DIR)/manifest.txt
    sh ./convert_gfx.sh $<
Handling sound effects
The Flappy Bird iOS bundle provides all of the game’s sound effects as separate .aiff files. Again, we need a way to propagate the sound data into the final ROM file. This is very similar to the three-step process for graphics:
- Convert the
.aifffiles into.rawfiles usingsox - Pack the
.rawfiles into a.dfsarchive usingmkdfs - Combine the compiled game code with the
.dfsarchive into a.z64ROM usingn64tool
For our purposes, the easiest format to parse and handle is raw 16-bit signed-integer waveform data in big-endian byte order at 44.1Khz with no fancy headers, containers, or other metadata. Luckily, there is an open-source command-line tool called sox (Sound eXchange) that can handle this conversion for us:
SOXFLAGS = -b 16 -e signed-integer -B -r 44100

$(PCM_DIR)/%.raw: $(AIFF_DIR)/%.aiff
    @mkdir -p $(PCM_DIR)
    @command -v sox >/dev/null 2>&1 || { \
        echo >&2 'This Makefile requires the `sox` command.'; \
        echo >&2 'Get it from http://sox.sourceforge.net/sox.html'; \
        exit 1; \
    }
    sox $< $(SOXFLAGS) $@ remix -
Wrapping up
We now have all of the image and sound effect resources extracted from the iOS bundle, modified to better-suit the Nintendo 64 hardware, and integrated into the compilation pipeline. Stay tuned for part four, where finally we are ready to start coding.
Thanks for reading!