Cloning Flappy Bird for the Nintendo 64 with libdragon (Part 2)
Editor’s Note: LibDragon has changed since this was originally written. The command-line and code snippets in this article may not work correctly anymore.
Welcome back to my post-mortem series looking back at building a Flappy Bird clone playable on actual Nintendo 64 hardware. This second part is an exploration of starting a project with the libdragon N64 homebrew toolchain. We will be compiling and installing an open-source N64 software development kit from source and using it to build and test an N64 ROM in an emulator.
![]()
Check out the other posts in this series:
Flappy Bird for Nintendo 64 Project Site
- Introduction to Flappy Bird and N64 homebrew
- Starting an N64 homebrew project with
libdragon - Adapting Flappy Bird resources to
libdragonand the N64 hardware
Preparing the workspace
libdragon expects the N64 SDK installation directory to be exported as the N64_INST variable in your shell. I have ensured that this variable is properly set in my bash sessions by adding it to ~/.bashrc (or ~/.bash_profile on MacOS):
echo "export N64_INST=${HOME}/Projects/n64/mips64-toolchain" >> ~/.bashrc
My preferred computing enviroment du jour is Arch Linux, so in the spirit of the bleeding edge, I have made some minor modifications to libdragon in order to resolve compilation issues I encountered and bumped the build dependency versions to the latest and greatest. You can clone my fork of libdragon if you’re following along at home:
cd $N64_INST/..
git clone git@github.com:meeq/libdragon.git
Who compiles the compilers?
Next, we will need to download, compile, and install a mips64vr4300 toolchain into $N64_INST in order to build libdragon. This will take quite a while, so sit back and enjoy the show as binutils, gcc (pass 1), newlib, and gcc (pass 2) configures, compiles, and installs before your very eyes.
LIBDRAGON_DIR=$(pwd)/libdragon
mkdir -p $N64_INST/tmp
cd $N64_INST/tmp
bash $LIBDRAGON_DIR/tools/build
Finally, we are ready to build and install libdragon and its supporting tools into $N64_INST:
cd $LIBDRAGON_DIRs
make install
make tools-install
Starting with a known-good working ROM
If all went well with the previous steps, we should be all set up and ready to build our first N64 ROM. We can verify that the toolchain installed correctly by compiling one of the examples included in libdragon:
cd examples/spritemap
sed -i -e 's/.v64/.z64/g' -e 's/$(N64TOOL) -b/$(N64TOOL)/g' Makefile
make
We now should have a spritemap.z64 ROM file that’s ready to be fed into an N64 emulator or flash cartridge.
A sidebar about byte-swapping

Thanks to the popularity of the Doctor V64 development device (pictured above) and a modified BIOS that allowed copying cartridge data over the V64’s parallel port, the V64 format is quite common in the N64 backup/emulation scene. Another popular device for dumping N64 ROMs was the Mr. Backup Z64 (pictured below), which produced files in the Z64 format onto ZIP-100 diskettes.

Byte-ordering is an artifact of CPU architecture that dictates how multiple bytes are combined to store larger values in memory. The Nintendo 64’s MIPS VR4300 CPU (as well as PowerPC CPUs) stores the most-significant byte (MSB) first, whereas Intel CPUs natively store the least-significant byte (LSB) in the lowest address. As you can see in the comparison below, the game title in the ROM header is clearly readable in Z64 format, but a garbled mess in the V64 format:
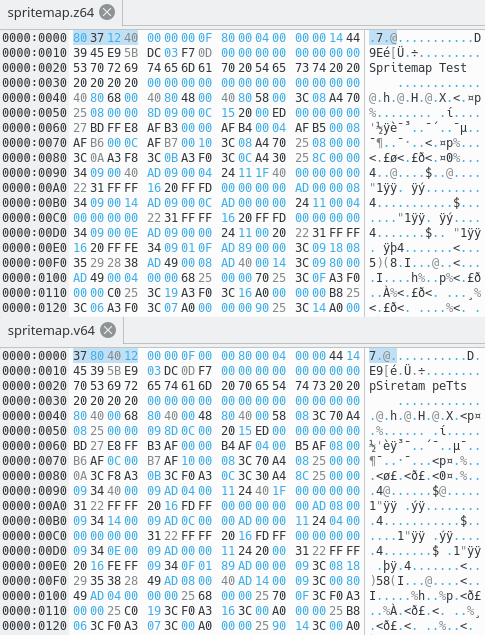
Some emulators are generous and will happily accept ROMs of either flavor, sometimes even inside of a .zip of .7z archive. In order to load ROMs with CEN64 you must provide a “Z64 big-endian (not byte-swapped) format” ROM instead of the “V64 little-endian (byte-swapped) format”.
Care and feeding of your CEN64
![]()
As we covered in part 1, libdragon requires accurate low-level emulation. You will also need a dump of the Nintendo 64 PIF ROM. At the moment, the best emulator I have found to test homebrew is CEN64 by Tyler Stachecki (MarathonMan). I recommend building and running from source to keep up with the latest improvements:
cd $N64_INST/..
git clone git@github.com:tj90241/cen64.git
cd cen64
cmake .
make
If all that was successful, you should be able to run the cen64 binary with the pifdata.bin PIF ROM and the spritemap.z64 cartridge ROM:
./cen64 $PATH_TO_PIFDATA_ROM $LIBDRAGON_DIR/examples/spritemap/spritemap.z64
![]()
Deconstructing the sample
So we’ve just built an N64 ROM, but what exactly is going on? Well there’s four big pieces here according to the Makefile:
- Compiling the C code into the
spritemap.oobject file - Linking
spritemap.owith the libraries into an ELF binary - Packing the
filesystemdirectory into a DragonFS archive - Combining the ROM header, ELF binary, and DragonFS archive into an N64 ROM file
Configuring hardware and subsystems
The very first thing N64 software must do is initialize the CPU and the system’s peripherals, which we can see at the top of the main function:
/* enable interrupts (on the CPU) */
init_interrupts();

/* Initialize peripherals */
display_init( RESOLUTION_320x240, DEPTH_16_BPP, 2, GAMMA_NONE, ANTIALIAS_RESAMPLE );
dfs_init( DFS_DEFAULT_LOCATION );
rdp_init();
controller_init();
timer_init();
Interrupts are necessary to handle low-level hardware events such as timers, DMA, and synchronization with the RCP. The DFS, RDP, controller, and timer subsystems have state that is managed by libdragon, so they must be initialized before their functionality can be used. The display subsystem supports a variety of resolutions, bit depths, gamma correction and antialiasing settings:
typedef enum
{
    RESOLUTION_320x240,
    RESOLUTION_640x480,
    RESOLUTION_256x240,
    RESOLUTION_512x480
} resolution_t;

typedef enum
{
    DEPTH_16_BPP,
    DEPTH_32_BPP
} bitdepth_t;

typedef enum
{
    GAMMA_NONE,
    GAMMA_CORRECT,
    GAMMA_CORRECT_DITHER
} gamma_t;

typedef enum
{
    ANTIALIAS_OFF,
    ANTIALIAS_RESAMPLE,
    ANTIALIAS_RESAMPLE_FETCH_NEEDED,
    ANTIALIAS_RESAMPLE_FETCH_ALWAYS
} antialias_t;
Handling images
The image data in this example has already been converted into 16-bit .sprite files using libdragon’s mksprite tool. These .sprite files can be read directly into the sprite_t data structure provided by graphics.h:
/* Read in single sprite */
int fp = dfs_open("/mudkip.sprite");
sprite_t *mudkip = malloc( dfs_size( fp ) );
dfs_read( mudkip, 1, dfs_size( fp ), fp );
dfs_close( fp );
Handling sprite animation
In order to decouple animation timing from runloop speed, this example sets up a timer to fire thirty times per second to increment an animation frame counter:
static volatile uint32_t animcounter = 0;

void update_counter( int ovfl )
{
    animcounter++;
}

int main(void)
{
    // ... Initialization code ...

    // Kick off animation update timer to fire thirty times a second
    new_timer(TIMER_TICKS(1000000 / 30), TF_CONTINUOUS, update_counter);

    // ... Main loop ...
}
Follow the infinite loop
The rest of the code runs inside of a while(1) block forever (or until the system is powered off). There are five main things that happen every frame in this example:
- Clear the framebuffer so we can start drawing graphics
- Draw this frame’s graphics to the framebuffer
- Display the current framebuffer with the VI (Video Interface)
- Capture controller input
- Process controller input to determine how to draw the next frame
While all of that is happening, the main loop is also being interrupted every 33.33 milliseconds to service the update_counter timer.
Do you prefer your drawing soft or hard?
The spritemap example has two code-paths for drawing based on the mode flag, which is toggled by pressing ‘A’ on player 1’s controller inside the main loop, and renders the sprites with either software or hardware-accelerated drawing routines. The end result looks identical, but under the hood these two approaches are quite different:
- Software rendering uses the CPU to iterate over image pixel data in RAM and set it to the framebuffer directly. This is the “slow way” of drawing sprites, but it is not subject to the harsh 4KB TMEM limitation that the RDP imposes.
- Hardware rendering uses the RDP to load texture data into TMEM and blit it into the framebuffer while the CPU performs other tasks. This is the “fast way” of drawing, but sprites larger than 4KB must be broken up into smaller tiles or drawn in software due to extremely limited texture memory.
Wrapping up
Okay, so now we’ve got a working toolchain and a sample project that gives us the absolute necessities of setting up graphics and controller input. We also have an emulator to test with. At this point we’ve got all the tools we need to get started building our own homebrew on the Nintendo 64. Read on for part 3 of this series for a break-down of how I translated Flappy Bird to suit the limitations of libdragon and the N64 hardware.
Thanks for reading!